Category Archives: Python

JSON for Security Specialists

JavaScript Object Notation began as a means to transport data from server to browser in JavaScript, but has since become an independent standard and a predominant method used by RESTful Web Services such as the VirusTotal API to deliver payload data. When you query a RESTful API you are likely to get back either JSON or XML, and of the two JSON is simpler and lighter, and thus more common.

Most IT Systems and Security specialists have heard of JSON and probably seen examples, but many have never actively played with it programmatically. It’s a useful tool in the InfoSec tool bag and an essential one for extracting , manipulating and presenting data gleaned from APIs.

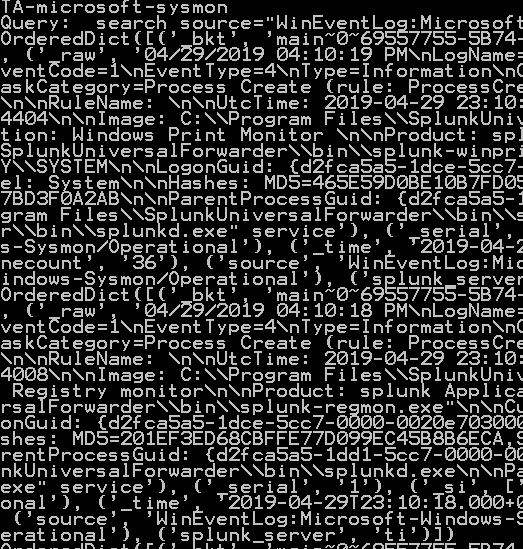
Referencing the HashChecker object from the 4th Python/Splunk series blog entry, we see that VirusTotal returns JSON. It’s easy to interrogate the JSON object and experiment with processing it using Jupyter. First, here is an example of how to check that the transaction was successful:

Successful ‘200’ ok response code

While it’s straightforward to retrieve and view all of the nested JSON from the query, it can be a bit of a jumble to organize and make sense of:


JSON object with no formatting

Using Python’s json module, it’s simple to improve the readability of the output and determine the logical structure of the data. The json.dumps method will dump out a string that can be indented for readability with the indent parameter:

Nicer output with json module’s ‘dump’ method

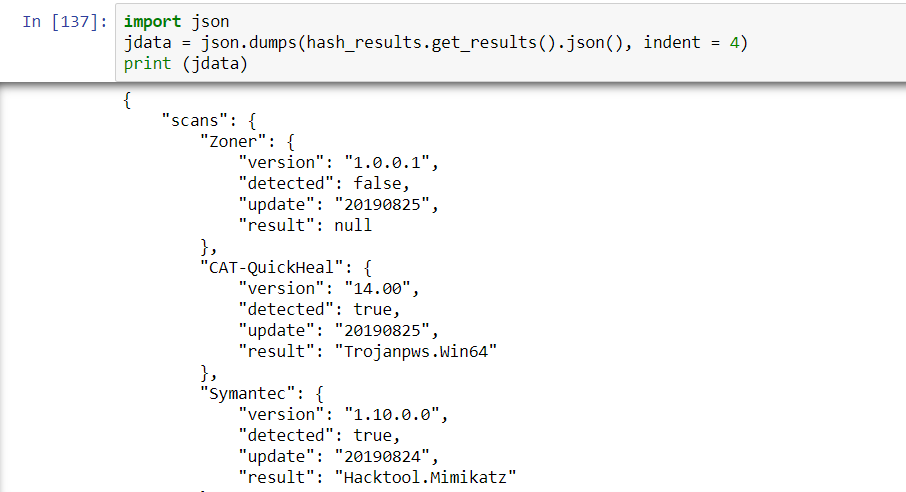
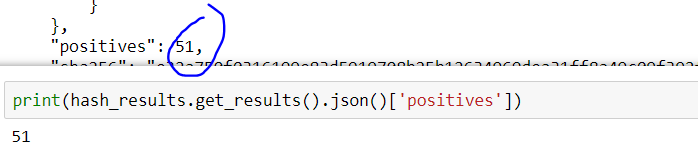
With this it’s possible to instantly see the logical structure of the response and see a way to quickly check the results for positive hits. As noted, if one checks the type of object that json.dumps() produces, it will turn out to be a string. Generically, JSON is a string. When you ingest JSON from the Requests object, it will be a dictionary.

print(type(jdata))
print(type(hash_results.get_results().json()))
Output of this:
<class 'str'>
<class 'dict'>

Since JSON is actually a string comprised of curly braces, commas, and brackets (similar to a Python dictionary), it’s easy to see how Python can ingest a nested JSON object as a dictionary object. Understanding the type makes it obvious as to how to interrogate the object. Returning to the positive hits question, let’s write the code to look at it:

Checking for a positive result on the hash submitted to VirusTotal

For the sake of demonstration, suppose we want to know if the AVG service detected a positive result from the hash–here is one-liner to achieve that by querying for the ‘AVG’ key in the nested dictionary based on the ‘scans’ level:

Understanding JSON more deeply and recognizing that the task of ingesting VT data into DataFrame is essentially ingesting a dictionary into a DataFrame, we can formulate more elegant code for the set_dataframe method — recall that this was previously an inelegant ‘slash and burn’ exercise into forcing a glob of data into the desired row/column format desired.

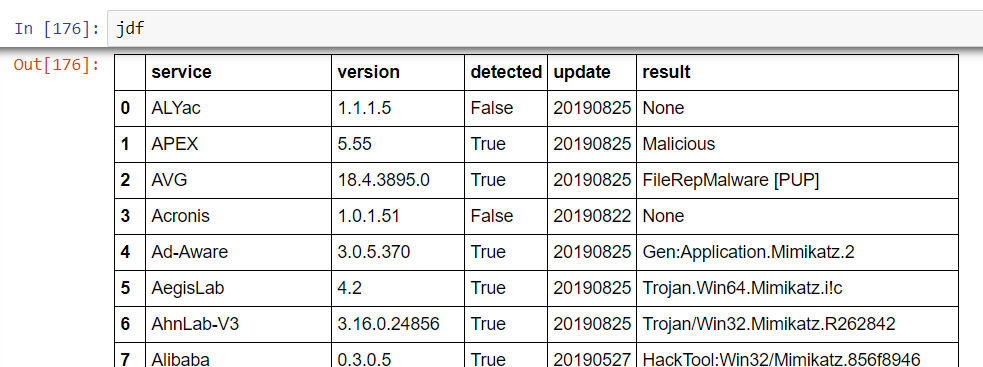
With improved comprehension of the logical structures involved, it’s now possible to rewrite the set_dataframe method in the HashChecker class without using a ‘for loop’ or transpositions. This is achieved using only a couple of lines–the new DataFrame is called jdf:

jdf = pd.DataFrame.from_dict(hash_results.get_results().json()['scans'], orient='index').reset_index()
jdf.rename(columns={'index':'service'},inplace=True)

The reset_index and rename methods are used so as not to end up with the service name as the index. The resulting DataFrame is now logically organized and ready to use.

Printing out the new DataFrame

The Jupyter Notebook used in this entry is available for download on github.

About Ray Zupancic

Python, Splunk and Endpoint Data (4th in a Series)

A more scalable approach to calling VirusTotal is to arrange the output of the Request as a Pandas Dataframe. The results of the calls could potentially be stored locally on a NoSQL instance such as ArangoDB or Mongo DB (search previous articles for a short exploration of ArangoDB).

import requests
import pandas as pd

class HashChecker():
    '''
    The HashChecker object is used  to process, arrange and store VirusTotal API calls
    against a file hash - the results are neatly arranged in a Pandas DataFrame
    
    
    hash : str
    This argument is used to pass the single hash in question 
    
    Todo:
    create the ability to pass multiple hashes
    '''

    
    def __init__(self, hash):
    
        self.hash = hash
        self.myparams= {}
        
        # HTTP Request results
        self.request_results = []
        
        # VirusTotal settings
        self.filename = 'c:\\projects\\python\splunk_py\\.virustotalrc'
        self.url = 'https://www.virustotal.com/vtapi/v2/file/report'
        
        # process the hash
        self.get_params()
        # Get the results of hash check from Request call
        self.request_results = self.get_results()
        
        # use a dataframe for flexibility and scalability
        self.df = pd.DataFrame()
        self.set_results_dataframe()
        
    def get_results(self):
        '''
        Method to call the REST API and check a single hash
        '''
        data = requests.get(self.url, params=self.myparams)
        return data

    def get_params(self):
        '''
        Method to get your hidden key from an ini file
        read the values from a file with format
        apikey=<yourapikey>
        '''
        with open(self.filename) as myfile:
            for line in myfile:
                key, value = line.partition("=")[::2]
                self.myparams[key.strip()] = value.strip()
                
    def set_results_dataframe(self):
        '''
        Method to create a dataframe with results using format
                    columns
            rows
            service1 detected   result  update  version
            service2 detected   result  update  version
        '''
        # use a dataframe that gets the normalized json from Request result
        # notice we only want the 'scans' level of the json
        self.df = json_normalize(self.request_results.json().get('scans'))
        
        # to aid in re-arranging more logically, tranpose rows and columns
        self.df = self.df.transpose()
    
        # create a holding dataframe in order to re-arrange the 
        # columns more logically
        ndf = pd.DataFrame(columns=['detected', 'result', 'update', 'version', ])    
        for i in range(0,len(self.df),4):
            ndf=ndf.append({ 'detected' : self.df.index[i].split('.')[0],
                             'result': self.df.iloc[i+1,0], 'update': self.df.iloc[i+2,0],
                             'version' : self.df.iloc[i+3,0]}, ignore_index=True)
        
        # reset the object dataframe to this new arrangment
        self.df = ndf
        

Using the above code leaves you with a hash result object, which you can easily interrogate and manipulate in a Jupyter Notebook:

# hash of mimikatz
resource = 'BCD703932C9BEDE27659407E458AE103D0B4CC88'
hash_results = HashChecker(resource)
print(hash_results.request_results)
print(hash_results.df.head(4))
Here is the response code from the Request
<Response [200]>

The first four rows.
  detected                result    update      version
0    ALYac                  None  20190719      1.1.1.5
1     APEX             Malicious  20190719         5.53
2      AVG  FileRepMalware [PUP]  20190720  18.4.3895.0
3  Acronis                  None  20190716     1.0.1.51

Notice that the data exchange format with VirusTotal is JSON. We did some crude ‘slash and burn’ processing to contort the nested JSON into a dataframe. This can be improved upon, and we will improve on it with a more extensive article on understanding JSON and introducing the json parsing module in Python.

For now, notice that JSON looks a lot like a Python Dictionary, but strictly speaking isn’t the same. Here’s an Important semantic distinction that will be helpful to keep in mind: A python dictionary is a data structure within Python, whereas JSON is a human and machine readable string format for exchanging information across platforms and languages.

In the first four rows it’s apparent that two services don’t detect mimikatz, and two do. AVG does a nice job of portraying exactly what is the case with mimikatz: a PUP – Potentially Unwanted Program. If this hash is on your Enterprise and your security team didn’t place it there, that’s likely an issue. In itself, though, it’s simply a security tool.

What has been created in these four articles on Splunk and API programming is a primitive start to an in-house Threat Intelligence service to test every process spawned. This can also be the start of an approach to whitelisting and/or baselining. By amassing a list of hashes and hash testing results locally, a security team can alert on any new process spawned on the Enterprise and/or not in a baseline.

It should be pointed out that the above is not in itself a sound strategy to combat mimikatz–anyone who has hired a pen-test team will know that a hash check isn’t going to stop a mimikatz attack. Smart hackers will either obfuscate the binary or use powershell to evade AV. You will only catch the most lame attempts with a hash check. The best approach is to stop storing passwords clear text in memory.

That said, it’s always possible that Virustotal, with its dozens of services, will turn up something interesting on a hash that local AV is missing. Passive whitelisting (alerting to new hashes on the Enterprise) together with tight Powershell auditing will provide a much more solid foundation. To state the obvious: things that have never been seen before are interesting, as far as scripts or executables.

Python, Splunk and Endpoint Data (3rd in a Series)

Sending the results of your Sysmon process information to VirusTotal using process hashes is fairly straightforward. First you will need to register an account with VirusTotal to receive an API key–the free registration type will limit you to a modest number (4) of submissions per minute, but works well for establishing a Proof-of-Concept for your project and testing code.

Let’s begin with a basic piece of coding that checks a hash against VirusTotal. In the last article we described using Sysmon to get the hashes to Splunk, and the Splunk SDK to get them to Python. Now we actually do something with them.

Refer to the VirusTotal API page for detailed examples of what types of things one may do. If you have never programmed using a RESTful API before and believed it was a dark art that only highly paid programmers dare undertake, you will be pleasantly surprised how accessible the techniques are to a security specialist. The modules available in Python make it painless as one need not learn how to format HTTP requests. The VirusTotal API provides examples in Python that you can copy and implement.

If you want to learn more about the Requests module that takes care of all the formatting details associated with HTTP Get Requests, check out this link for descriptions and tutorials. Otherwise, feel free to concentrate on consuming the data versus the minutia of the communication.

'''
Simple program to exercise VirusTotal API
Check out VirusTotal API documentation at:
    https://developers.virustotal.com/reference#getting-started
'''

import requests


def get_hash_check(paramsl):
    ''' procedure to call the REST API and check a single hash
    '''
    url = 'https://www.virustotal.com/vtapi/v2/file/report'
    return requests.get(url, params=paramsl)

def get_params(filename):
    '''read values from a file and get parameters
       if your key is in a file with format
        apikey=<yourapikey>
        resource=<hash>
    '''
    myparams = {}
    with open(filename) as myfile:
        for line in myfile:
            key, value = line.partition("=")[::2]
            myparams[key.strip()] = value.strip()
    return myparams

def main():

    # data
    filen = 'settings.txt'

    # get the params from file
    params = get_params(filen)

    # get the results
    response = get_hash_check(params)

    # response is type requests and has a json method
    print(response.json())


if __name__ == '__main__':
    main()

In this case, I used a hash of the ubiquitous hacker and pentester’s tool Mimikatz to incite a positive response. In raw JSON, the response is long and messy–here is a snippet:

{‘positives’: 44, ‘scan_date’: ‘2019-07-23 12:43:24’, ‘response_code’: 1, ‘scan_id’: ‘e32a750f0316199e83d5919708b25b12634969dea31ff8a49c09f392f8e9a2f3-1563885
804′, ‘scans’: {‘Microsoft’: {‘detected’: True, ‘version’: ‘1.1.16200.1’, ‘update’: ‘20190723’, ‘result’: ‘HackTool:Win32/Mimikatz.E’}, ‘Cyren’: {‘detected’:
True, ‘version’: ‘6.2.0.1’, ‘update’: ‘20190723’, ‘result’: ‘W64/S-b61adc75!Eldorado’}, ‘F-Prot’: {‘detected’: False, ‘version’: ‘4.7.1.166’, ‘update’: ‘20190
723′, ‘result’: None}, ‘ViRobot’: {‘detected’: False, ‘version’: ‘2014.3.20.0’, ‘update’: ‘20190723’, ‘result’: None}, ‘AhnLab-V3’: {‘detected’: True, ‘versio
n’: ‘3.15.3.24531’, ‘update’: ‘20190723’, ‘result’: ‘Trojan/Win32.Mimikatz.R262842’}, ‘Zoner’: {‘detected’: False, ‘version’: ‘1.0’, ‘update’: ‘20190723’, ‘re
sult’: None}, ‘Alibaba’: {‘detected’: True, ‘version’: ‘0.3.0.5’, ‘update’: ‘20190527’, ‘result’: ‘HackTool:Win32/Mimikatz.856f8946’}, ‘K7GW’: {‘detected’: Tr
ue, ‘version’: ‘11.58.31548’, ‘update’: ‘20190723’, ‘result’: ‘Hacktool ( 0043c1591 )’}, ‘Endgame’: {‘detected’: True, ‘version’: ‘3.0.12’, ‘update’: ‘2019052
2′, ‘result’: ‘malicious (high confidence)’}, ‘Cylance’: {‘detected’: True, ‘version’: ‘2.3.1.101’, ‘update’: ‘20190723’, ‘result’: ‘Unsafe’}, ‘Arcabit’: {‘de
tected’: True, ‘version’: ‘1.0.0.850’, ‘update’: ‘20190723’, ‘result’: ‘Application.Mimikatz.2’}, ‘Rising’: {‘detected’: True, ‘version’: ‘25.0.0.24’, ‘update

Python, Splunk and Endpoint Data (1st in a Series)

This is a first of a series of articles exploring the use of Python to search Splunk and add levels of automation to the resulting data analysis. Splunk not only provides a RESTful API for web services, it also provides an SDK–meaning that implementation components are provided to make programming straight-forward. Splunk Docs also contains many good code examples to get programmers off to a running start.

Let’s start by getting our code connected to Splunk with a simple connection class. From there we will move on to installing Sysinternal’s SysMon utility and implementing simple searches of Sysmon-based logs, and then finally to some automation routines on large result sets. It may also be instructive to consider how one might implement some behavior-based detection and analysis on Sysmon datasets.

There are quite a few examples floating around of connecting to Splunk with Python using the SDK’s connect routine–including in the Splunk Docs. As simple an exercise as this is, in some cases the examples are incomplete and missing a few steps, or I otherwise could not always make the Splunk Docs code work (e.g. reading a credentials file with the code in Splunk Docs seems not functional). Hence, it was simpler just to write a classful implementation as a starting point.

Below is a connection class that works with my Anaconda Python v3 after having used the pip utility to install the SDK. For ease of development, it uses a splunkrc file with name value pairs including username, host, password. I will show how you might implement credentials in production more safely in a later entry. By the way, standard disclaimer: don’t try any of this in production until you thoroughly understand, experiment and test the code and configuration in your dev environment.

How to Use

  • The first step is to install the SDK, I suggest using pip. Find the detailed instructions here.
  • Install the class in a file called splunk_connect.py in the same dir as the driver code mentioned next. Otherwise edit the driver to refer to the correct module to import.
  • place a .splunkrc in the same dir you are running the code from with the directions to your instance

A simple Connection Class

import splunklib.client as splunkclient

class SplunkConnection:
    DEBUG = False

    def __init__(self):
        'create a Splunk service instance and log in'
        self.service = ""
        self.kwargs = self.get_credentials_from_rc()
        if self.DEBUG:
            print (self.kwargs)
        # connect requires keywords not positional args
        self.service = splunkclient.connect(**self.kwargs)
        if self.DEBUG:
            print ('service: ' , self.service)

    def get_credentials_from_rc(self):
        'read connection parameters from an rc file'
        '''to use: create a splunkrc file that has username, host, etc:
           username = somename
           host = myhost
           password = somepass
           ...
        '''
        kwargs = {}
        with open(".splunkrc") as myfile:
            for line in myfile:
                name, var = line.partition("=")[::2]
                # by convention python comm likes to use kwargs as the
                # name of key word sweeper dictionary
                kwargs[name] = var.rstrip()
        return kwargs

    def get_app_names(self):
        'print installed apps to the console to verify login'
        app_list = []
        for app in self.service.apps:
            app_list.append(app.name)
        return app_list

Now you simply need a driver or wrapper for this connection class to test it out. Here is some simple code to get started: printing out the installed apps is a basic exercise that the Splunk Docs sites used to demonstrate successful connection.

from splunk_connect import SplunkConnection

def main():
    sc = SplunkConnection()
    app_name_list = sc.get_app_names()
    for app_name in app_name_list:
        print( app_name)

if name == 'main':
     main()

This is a start, but doesn’t provide anything particularly useful as of yet. Before implementing a Splunk Search Class, let’s install a utility that will prove invaluable for generating endpoint security data for analysis: Microsoft SysInternal’s Sysmon utility is both free and incredibly useful. There are plenty of information sources on how to install and filter Sysmon . Here are two of note:

Review both of these sites to learn more about configuring your endpoints with Sysmon for forwarding data in a CIM-searchable manner to Splunk. The emphasis here is not to repeat a lot of material readily available on the web, but to get beyond the threshold of automating analysis on large blocks of data.

Although installing Sysmon and the Sysmon TAC are simple, I am likely understating the task of tuning Sysmon with a config file. The Swift on Security XML filter will do that, but it deserves some study and will be an area of ongoing work for an Enterprise that wants to effectively operationalize Sysmon feeds into Splunk. It’s the age-old signal in the noise challenge.

Moving forward, let’s develop a straight-forward Search class and driver so we can get access to real data.

import splunklib.results as results

class SplunkSearch:
    DEBUG = True

    def __init__(self,service):
        'create a Splunk service instance and log in'
        self.job = ''
        self.jobs = service.jobs

    def set_blocking_search(self,query, num_results):
        'place a blocking search on jobs collection'
        # num results can be 0 for no limit, or limited by num_results

        if num_results == 0:
            search = query
        else:
            search = query + ' | head ' + str(num_results)

        if self.DEBUG:
            print ('Query: ', search)

        kwargs = {"exec_mode": "blocking"}
        self.job = self.jobs.create(search, **kwargs)

    def set_search(self,num_results):
        pass


    def get_search_results(self):
        rr = results.ResultsReader(self.job.results())
        return rr

Now augment the previous driver to exercise this search object. It would be simple to build a constructor that takes everything including type of search (e.g. blocking, non-blocking, number of results, index, …). In fact, with a bit of extra effort one can create a GUI interfaces in Python: this would present a Threat Hunter with a form to automate a Sysmon search and perform hash submissions to VirusTotal and/or IP analysis sites. It will also be possible to embed these types of functionality directly into Splunk so that one never needs to leave the Splunk Web Interface. For now, though, we will keep the Python code as stand-alone from the Web Interface.

from splunk_connect import SplunkConnection
from splunk_search import SplunkSearch

def main():
    sc = SplunkConnection()
    app_name_list = sc.get_app_names()
    for app_name in app_name_list:
        print( app_name)


    # run a search
    ss = SplunkSearch(sc.service)
    # define the search in SPL
    query = 'search source="WinEventLog:Microsoft-Windows-Sysmon/Operational"'
    # limit to 10 results (just for demo speed) and set the search
    ss.set_blocking_search(query,10)
    # display the results
    for result in ss.get_search_results():
        print (result)


if __name__ == '__main__':
    main()

Running this provides a glimpse into where these techniques can become useful: we can see real process data including parent processes, hashes, etc. If you use the -n option for starting Sysmon, you also get network information. It’s not hard to see how we can move this forward into a vehicle for everything from alert-based whitelisting to automated uploads to VirusTotal. Here is the result on my test dev system. We can work on formatting it into a nicer display and sending it to useful places for analysis in the next article.

Sysmon output to Splunk

The Jupyter Notebook and supporting classes are available on github.

Generating Random User Data with Python

The task of creating voluminous lists of generated data for testing can be arduous if one starts from scratch programmatically. Generating 20,000 or so realistic names, for example, is challenging if you want the names to be realistic and unique. The same is true for locations. However, such a task is a relative breeze if one installs and learns to use a good random data generator library.

An example that I have used of late is the faker module for Python. One can create endless lists of generated names, IDs, serials, locations including zips and city/country, etc and match these to weighted lists of specified values such as  departments or equipment type. Suppose a list of 20,000 names and employee IDs needs to be spread across a weighted distribution such as 10% sales, 10% marketing, 20% research, 40% warehouse. Using np.random.choice and the fake-factory this becomes simple.


def dept(self):

depts = [‘Marketing’,’IT’,’Sales’,’Research’,’Warehouse’]
# weights of choices in order or depts
p_dist = [.1,.2,.1,.2,.4]
# return a weighted random choice
return np.random.choice(depts,size=1,p=p_dist)[0]


However, creating this as provider class and integrating with the ability to create randomized name lists for thousands of objects is harder. Faker does that for us.

Here is a quick list of employees generated with faker as the core:


Christopher Sharp,5035341812376,Buchananburgh,ER,Apple
Christopher Shaw,6852349930500,Levinefort,AU,HP
Shannon Ray,1147556676996,Amandahaven,IS,Lenovo
Heather Lee,0822069553149,Higginston,CO,Lenovo
Samuel Hernandez,4779389153831,Brownfurt,LK,Dell
Mary Little,8310074570012,South Michaelbury,ME,Lenovo
Kelsey Munoz,1154029900069,West Brittanyfurt,IE,Dell
Toni Larson,6596085286537,Campbellfort,NA,Lenovo
Michael Oliver,4952428472401,Elizabethborough,RS,Lenovo
Jamie Morrison,1395021567373,Louisstad,BS,Lenovo
Melvin Parker,7496896418990,Lake Christopher,RU,Dell
Amy Ramirez,8320231525274,Port Andrewview,SO,Dell
Mark Morris,5569775848620,Robertstad,SN,HP
Kimberly Bryant,3424731814526,Richardtown,KN,Dell


This requires a few minutes of effort including adding a set of customized provider classes (e.g. a weighted set of organizational departments) to the existing random generators. This library has saved me vast amount of time and allowed for quick customization of large dataset generation. I thought others might find the example useful. Get the sample code at Github.