Category Archives: NVD CVE

Binning with Pandas

This article will review two powerful and timesaving methods available from Pandas and Numpy that can be applied to problems that frequently arise in Data Analysis. These techniques are especially applicable to what is sometimes called ‘binning’ -transforming continuous variables into categorical variables.

The two methods are np.select() and pd.cut(). I call these Pandas tricks, but some of the actual implementation is taken from Numpy and applied to a Pandas container.

np.select()

Most Pandas programmers know that leveraging C-based Numpy vectorizations is typically faster than looping through containers. A vectorized approach is usually simpler and more elegant as well–though it may take some effort to not think in terms of loops. Let’s take an example of assigning qualitative severity to a list of numerical vulnerability scores using the First.org CVSS v3 mapping:

RatingCVSSv3 Score
None0.0
Low0.1 – 3.9
Medium4.0 – 6.9
High7.0 – 8.9
Critical9.0 – 10.0
First.org qualitative CVE Severity Table

Suppose you have a large DataFrame of scores and want to quickly add a qualitative severity column. the np.select() method is a fast and flexible approach for handling this transformation in a vectorized manner. We can begin by making up some fictional CVEs as our starting dataset

import numpy as np
import pandas as pd
df = pd.DataFrame({"CVE":["CVE-2030-"+ str(x) for x  in range(1,101)],"CVSSv3":(np.random.rand(100)*10).round(2)})

The above is a quick way to build a random DataFrame of made-up CVEs and scores for demonstration purposes. Using np.select() presents a slick vectorized approach to assign them the First.org qualitative label.

Begin by assembling a Python list of conditions based on the First.org labels, and place outcomes in separate Python list.

conditionals = [
    df.CVSSv3 == 0,
    (df.CVSSv3 >0) & (df.CVSSv3 <=3.95),
    (df.CVSSv3 >3.95) & (df.CVSSv3 <=6.95),
    (df.CVSSv3 >= 6.95) & (df.CVSSv3 <=8.95),
    (df.CVSSv3 >= 8.95) & (df.CVSSv3 <= 10)
]

outcomes = ["None","Low","Medium","High","Critical"]

Using the Conditionals

At this point a new qualitative label can be applied to the dataset with one vectorized line of code that invokes the conditionals and labels created above:

df["Severity"] = np.select(conditionals,outcomes)

pd.cut()

An alternative approach, one that is arguably programmatically cleaner but perhaps less flexible, is the Pandas cut() method. There are lot of options for using pd.cut(), so make sure to take some time to review the official documentation to understand the available arguments.

One option is to set up a series of intervals using a Python list. It is important to remember that the intervals will, by default, be closed to the right and open to the left. Below is an initial attempt to pattern intervals after the First.org boundaries

bins = [0,0.01,3.95, 6.95, 8.95, 10]

Now that the boundaries are established, simply add them as arguments in a call to pd.cut()

df["Severity2"] = pd.cut(df.CVSSv3,bins, labels=["None","Low","Medium","High","Critical" ], retbins=False)

This results in the following

As always, it is prudent to do some testing: especially to test the boundary conditions. We can redo the array-building exercise while appending a few custom rows at the end using the following code:

np.random.seed(100)
df = pd.DataFrame({"CVE":["CVE-2030-"+ str(x) for x  in range(1,101)],"CVSSv3":(np.random.rand(100)*10).round(2)})
df.loc[len(df.index)] = ['CVE-2030-101', 0] 
df.loc[len(df.index)] = ['CVE-2030-102', 10] 
df.loc[len(df.index)] = ['CVE-2030-103', 0.1] 
df.loc[len(df.index)] = ['CVE-2030-104', 9.0] 
df.loc[len(df.index)] = ['CVE-2030-105', 4.0]
df.loc[len(df.index)] = ['CVE-2030-106', 3.96]
df.tail(10)

The df.loc[len(df.index)] simply locates the index value needed to add an additional row. Setting a random seed in line 1 above makes the DataFrame reproducible despite the values being randomly generated.

Now, if this were a unit test, then we would assert that CVE-2030-101 would have qualitative value ‘None’ and CVE-2030-106 would have qualitative value ‘Medium’. Note that for readability we can also improve the way we label the columns of the DataFrame to more readily identify the type of binner employed. Running the binner routines results in:

np.random.seed(100)
df = pd.DataFrame({"CVE":["CVE-2030-"+ str(x) for x  in range(1,101)],"CVSSv3":(np.random.rand(100)*10).round(2)})
df.loc[len(df.index)] = ['CVE-2030-101', 0] 
df.loc[len(df.index)] = ['CVE-2030-102', 10] 
df.loc[len(df.index)] = ['CVE-2030-103', 0.1] 
df.loc[len(df.index)] = ['CVE-2030-104', 9.0] 
df.loc[len(df.index)] = ['CVE-2030-105', 4.0]
df.loc[len(df.index)] = ['CVE-2030-106', 3.96]
df["Severity pd.cut()"] = pd.cut(df.CVSSv3,bins, labels=["None","Low","Medium","High","Critical" ])
bins = [0,0.01,3.95, 6.95, 8.95, 10]
df["Severity np.select()"] = np.select(conditionals,outcomes)
df.tail(10)
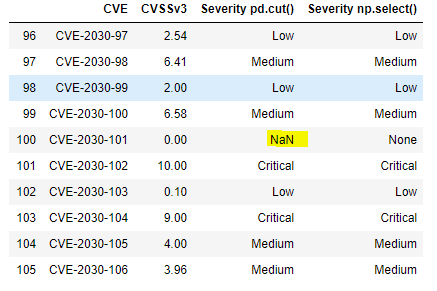
The boundary testing has turned up a problem: the pd.cut() doesn’t handle the value zero because the first interval – 0, 0.1 is open on the left. Such an interval is designated by math types as (0, 0.1], with the parenthesis indicating that zero is not contained in the interval. This bug is easily addressed–the interval can be started at -.99 rather than zero. Alternatively, one could use the method’s arguments to adjust the open-on-left, closed-on-right default behavior.

The pd.cut() bin intervals are adjusted as:

bins = [-.99,0.01,3.95, 6.95, 8.95, 10]

Running the entire code again looks like this:

np.random.seed(100)
df = pd.DataFrame({"CVE":["CVE-2030-"+ str(x) for x  in range(1,101)],"CVSSv3":(np.random.rand(100)*10).round(2)})
df.loc[len(df.index)] = ['CVE-2030-101', 0] 
df.loc[len(df.index)] = ['CVE-2030-102', 10] 
df.loc[len(df.index)] = ['CVE-2030-103', 0.1] 
df.loc[len(df.index)] = ['CVE-2030-104', 9.0] 
df.loc[len(df.index)] = ['CVE-2030-105', 4.0]
df.loc[len(df.index)] = ['CVE-2030-106', 3.96]
bins = [-.99,0.01,3.95, 6.95, 8.95, 10]
df["Severity pd.cut()"] = pd.cut(df.CVSSv3,bins, labels=["None","Low","Medium","High","Critical" ])
df["Severity np.select()"] = np.select(conditionals,outcomes)
df.tail(10)

This is the result we were expecting.

Note one other interesting implementation detail; the CVSSv3 mapping from First.org uses precision = 1 and the code and data generation used here was done with precision = 2. That is a detail that may well have led to unexpected results. We could have adjusted the random generator to round to a single digit after the decimal, or simply reset the DataFrame using the round function:

df = df.round(1)
Finishing the NVD JSON MongoDB Mirror

Finishing off the discussion of NVD JSON mirroring: there is a repository available for download here via github including a Jupyter Notebook that contains all of the functionality discussed in the various NVD-CVE blog posts.

To start using the Notebook you must install Mongodb: follow the steps below as a rough roadmap–there are countless platform specific, step-by-step guides available as references on how to install and get started with a Mongodb instance.

  • Install MongoDB
  • Create a database named nvd with two collections: maincol and modscol
  • Create a user than can admin the above db and collections
  • Determine a configuration directory where you will place an environment file for connecting to your mongodb instance
  • Determine a working directory for downloading the NVD files
  • Place a file named “.mongo.env” in the configuration directory of choice (e.g. your home directory). The structure of this file is described in the Jupyter Notebook

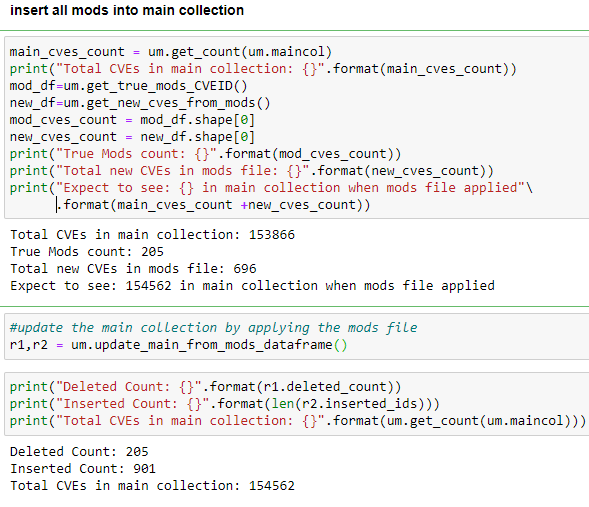
To begin, the code contains a method (see below) to download and insert the NVD JSON yearly files into the maincol collection. Next there are routines to update this main collection of CVEs with the modification file that NVD provides. NVD suggests initially downloading the yearly files, then updating them by periodically applying the modifications file–the modifications file will contain both revised and new CVEs. A reasonable automated schedule might be to re-download and reload the nvdcve-1.1-modified.json.zip file once or twice per day. The modifications file goes back eight days–If not reapplied at least every eight days it will fall too far behind. If that happens, the yearly files will need to be re-downloaded and reloaded.

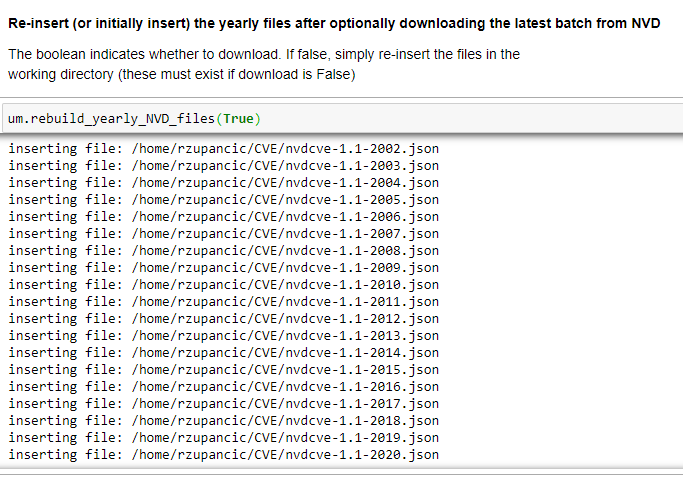
The example images below depict an invocation of the method to load/reload the yearly files from NVD onto your local mirror, and then a method to reload the modification file. In the code below, um is an instance of the UpdateMongo Class defined in the Notebook.

Invoking a method on the Jupyter Notebook to redownload and reload the NVD yearly JSON files
Redownload and reload the modification file

Apply the Modifications File

In order to keep the main collection of CVEs updated, the modifications file must be frequently updated and applied to the main collection. The modifications file, recall, has both new and modified CVEs in it. Applying it essentially means avoiding duplicates by updating CVEs that exist in the main collection, and adding brand new CVEs that exist in the mods file but not in the main collection. The Class method:

<em><span style="color:#389ec0" class="has-inline-color">update_main_from_mods_dataframe()</span></em>

does this. It has ‘dataframe’ at the end of its name to designate that it uses Pandas DataFrames to determine what is common in each collection–versus pymongo routines. I tend to rely on Pandas for anything that looks like ETL (Extract, Transform, Load).

Demonstration of applying the mods file

Download the github repository containing the code, install Mongodb, and follow along in the Notebook to insert and manipulate your CVE mirror. If you can get through the various steps to the point of adding customization for your own environment, you will have become at least somewhat proficient in using Mongodb, Python and Pandas.

What’s Next?

CVE repositories are most useful when you can add environmental components to the scoring as well as Threat Intelligence. The next exploration demonstrates adding more information and local context through a TI and Asset Discovery layer.

Working with NVD Json inside of mongodb

In the last entry we added an NVD file to MongoDB with an insert command from PyMongo. Hence, at this point we have a single yearly NVD file (2002) posted in to a MongoDB and we want to investigate if this is a useful way of managing the NVD data. Was this an optimal approach to managing a store of CVE data? Let’s review by querying what exists in the new MongoDB nvdcve collection:

The query can be done in Python, but a very convenient method to quick check the collection is through either a graphical MongoDB interface query tool or simply the command line mongo client that was installed with MongoDB. In this case, I simply use the mongo client to quickly query the collection:

db.nvdcve.find({},{id:1})
{ “_id” : ObjectId(“5f0bd7b9f9cdf5e2f0183be6”) }
db.nvdcve.find({},{id:1}).count()
1

If you expected that each CVE# would appear as a document–that was wishful thinking not immediately implemented in the structure of the downloaded document. Instead, there is one large document for the year containing all the year’s CVEs as sub-documents under one umbrella document ID.

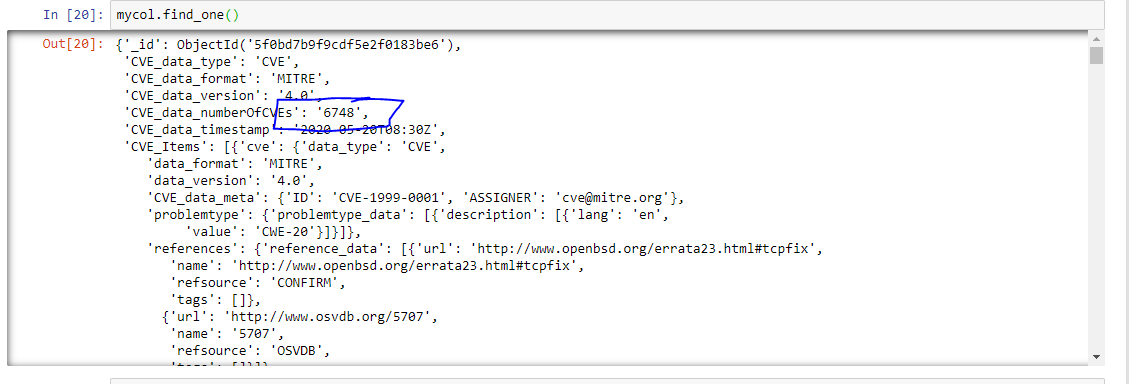
This can be easily verified in Jupyter with Python code as well: using the find_one() method we see that there are 6748 CVEs listed under one document.

6748 CVEs inside one master document–likely not an optimal organization

This format likely isn’t ideal. As an alternative, it’s simple to flatten out the nested JSON to where we could insert documents keyed by CVE#–given that is the way almost everyone searches and uses the NVD database. Recall earlier posts about flattening JSON–they will be useful for this task.

Below is a code example to flatten, clean-up some key names and insert into the collection.

#read the json file
with open('nvdcve-1.1-2002.json') as data_file:    
    data = json.load(data_file)  
#normalize out the CVEs
df = json_normalize(data,'CVE_Items')
df.rename({'cve.CVE_data_meta.ID':'CVE_ID'}, axis=1,inplace=True)
#change the awkward index name
df.rename_axis('CVE')
#MongoDB doesn't like '.' in key names
df.columns = df.columns.str.replace(".", "_")
#insert records into MongoDB
result =mycol.insert_many(df.to_dict('records'))

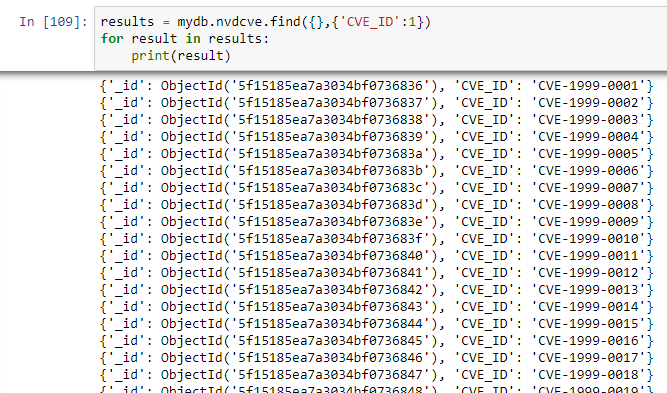
This produces the below document count, which is likely more amenable to working with CVEs.

Re-checking the document count

As demonstrated below, this structure more intuitive to work with and query against.

The new structure allows for simple querying of CVEs

NVD JSON in MongoDB

Most organizations that mirror CVEs do so because they are adding Temporal and/or Environmental components to the Base CVSS score. It is likely efficient to store scores from a feed in a traditional RDBMS. However, if an organization needs to combine unstructured data such as news articles, email chains, etc to their CVE data, then a database that optimizes unstructured storage may be worth considering.

Adding overall CVE information (e.g. CVSS Base/Temporal/Environmental scoring) together with TI and asset investigations to MongoDB is one solution for managing all the information in a hybrid structured/unstructured format. The result will be easily searchable and indexable. Starting with simple routine to insert a file, I will demonstrate how to achieve this and ultimately build a simple scoring platform.

Let’s start with a simple piece of code to store the credentials on the file system rather than in the code.

def get_params(filename):
    '''read values from a file and get parameters
        place your mongodb connect information in this file
        server,<yourservername or IP>
        username,<username>
        password,<mongopassword>
        authSource,<db you are authenticating against>
    '''
    myparams = {}
    with open(filename) as myfile:
        for line in myfile:
            key, value = line.partition("=")[::2]
            myparams[key.strip()] = value.strip()
    return myparams

Now add a bit of pymongo connection code–see the many documents available on pymongo using a Google search:

import json
from pymongo import MongoClient
def connect_mongo(params):
    '''Connect to a mongo instance using params from input
        params - a dictionary with user, password, server and database
    '''
    client = MongoClient(params.get("server"),\
                          username=params.get("user"),\
                          password=params.get("password"),\
                          authSource=params.get("authSource"),\
                          authMechanism='SCRAM-SHA-1')
    return client
    

Finally, add some code to actually insert the file:

def insert_json_file(client, db, collection, file):
    mydb = client[db]
    mycol = mydb[collection]
    
    with open(file) as jsonf :
        file_data = json.load(jsonf)
        if isinstance(file_data, list):
            mycol.insert_many(file_data)
        else:
            mycol.insert_one(file_data)

    client.close()

Most of the above code is available on various MongoDB-Python tutorials for those that want to understand it in more depth. Calling the code and actually inserting a document is simple:

par = get_params("mongo.env")
cli = connect_mongo(par)
insert_json_file(cli, "nvd", "nvdcve", "nvdcve-1.1-2002.json")

This inserts the 2002 JSON file into Mongo. Note that the db I used requires authentication (many MongoDB-Python demonstrations on the web omit authentication).

Working with NVD’s JSON Download Feed

NIST’s National Vulnerability Database site maintains a collection of json files that comprise the entire historical repository of CVEs from the beginning of the CVE era (1999) up to the current day. This data is available in the public domain, and it can be systematically downloaded to maintain a local mirror.

This is the first in a series of articles that will demonstrate how to implement a local mirror of NVD data and manipulate this data for your organization’s purposes.. The NVD site maintains the data as a collection of yearly files (plus some ongoing ‘catch-up’ files) . The JSON data repository is located here.

Why Build a Mirror

There are various good reasons why a local repository may be useful:

  • Creating a daily report on new incoming CVEs
  • Easily searching or reporting on the data, or combining the CVEs with other local data for reporting.
  • Feeding a daily process that ties a Threat Intelligence (TI) feed to the CVEs and ranks their importance on your Enterprise.
  • Combining the feed with Environmental components from findings on an Enterprise.

Most organizations rely on their scanning platform to rate severity and priority–this is usually based on CVSS3 scores. This approach is a good start, but it may not be enough. Augmenting the data with threat intelligence streams not available via the platform’s plugin feed may be a requirement. Finally, the price of the NVD data stream is right–as mentioned, it is available for the taking. Aggregated with various low-cost streams, this is a compelling advantage given that some CVE data streams can cost hundreds-of-thousands of dollars per year.

An organization may find it more effective to re-score findings based on environmental considerations. Scanning platforms are not going to figure in an Environmental component, even when those platforms can augment CVE Base scores with a Temporal score based on TI.

Getting the Data

That is the case for why this may be useful. Exploring how to go about using this: The first step is to download the yearly data using some simple scripting:

def get_NVD_files(d_path):
    '''Public method to download NVD datafiles in zip format, the URL is: 
        https://nvd.nist.gov/feeds/json/cve/1.1/nvdcve-1.1-[year].json.gz
        inputs: d_path - directory path as string
    '''
    
    for year in range(2002,2020):
        file = 'nvdcve-1.1-' + str(year) + '.json.zip'
        #need the URL, which for NVD files is an embedding of the year
        url = 'https://nvd.nist.gov/feeds/json/cve/1.1/' + file
        f = requests.get(url, allow_redirects=True)
        #save the file
        f_path = d_path + file
        open(f_path, 'wb').write(f.content)
        f.close()

Exploring the Data

Next, it’s instructive to take a look at this data and examine how it is formatted. Pandas seems a reasonable choice to load in some data for exploration. You may want to refer back to a previous article on viewing JSON data with Pandas. Using a Jupyter Notebook is perfect to interactively examine it. Here we take a couple of years data and aggregate it into a DataFrame.

taking a look at a few years with a Pandas DataFrame
cve_df = pd.DataFrame()
for year in range(2002,2005):
    filename = 'nvdcve-1.1-' + str(year) + '.json.zip'
    f_path = "D:/projects/NVD/" + filename
    #read into a temp dataframe and then aggregate
    df = pd.read_json(f_path, orient='columns', encoding='utf-8')
    #now aggregate it into a running total
    #cve_df = pd.merge(cve_df, df, left_index = True, right_index = True, how = 'outer')
    cve_df = cve_df.append(df,ignore_index=True)

Taking a look at this DataFrame in Jupyter: it has 10998 rows and only 6 columns:

2002

Taking a look at row 0 should allow us to look at the very first CVE. It is clear from the above that the interesting information is deeply nested in column 5–the CVE_Items columns The command to do this is simply cve_df.iloc[0,5]:

CVE-1999-0001

The CVE_Items column is deeply nested JSON–this amounts to a deeply nested dictionary in Python. It would possible to flatten these dictionaries into a dataframe with a lot of columns, but the first problem is readily apparent: the cpe_match list has an arbitrary number of dictionaries. If flattened completely, the result will be an arbitrarily large number of columns that differ from CVE to CVE, and the DataFrame will be unwieldy and not that helpful.

Conversely, if no flattening occurs, the most interesting information including the CVE# will be deeply nested inside dictionary objects. So, what is the best approach? There are various options to explore:

  • Completely flattening the nested JSON
  • Partially flattening the JSON and storing in a Relational Database.
  • Storing the data as JSON and rendering it in partially flattened DataFrame might be a path to pursue.